17.2.1. Dry preservation
Killing and handling prior to dry mounting
Insects that are intended to be pinned and stored dry are best killed either in a killing bottle or tube containing a volatile poison, or in a freezer. Freezing avoids the use of chemical killing agents but it is important to place the insects into a small, airtight container to prevent drying out and to freeze them for at least 12–24 h. Frozen insects must be handled carefully and properly thawed before being pinned, otherwise the brittle appendages may break off. The safest and most readily available liquid killing agent is ethyl acetate, which although flammable, is not especially dangerous unless directly inhaled. It should not be used in an enclosed room. More poisonous substances, such as cyanide and chloroform, should be avoided by all except the most experienced entomologists. Ethyl acetate killing containers are made by pouring a thick mixture of plaster of Paris and water into the bottom of a tube or wide-mouthed bottle or jar to a depth of 15–20 mm; the plaster must be completely dried before use. To “charge” a killing bottle, a small amount of ethyl acetate is poured onto and absorbed by the plaster, which can then be covered with tissue or cellulose wadding. With frequent use, particularly in hot weather, the container will need to be recharged regularly by adding more ethyl acetate. Crumpled tissue placed in the container will prevent insects from contacting and damaging each other. Killing bottles should be kept clean and dry, and insects should be removed as soon as they die to avoid color loss. Moths and butterflies should be killed separately to avoid them contaminating other insects with their scales. For details of the use of other killing agents, refer to either Martin (1977) or Upton (1991) under Further reading.
Dead insects exhibit rigor mortis (stiffening of the muscles), which makes their appendages difficult to handle, and it is usually better to keep them in the killing bottle or in a hydrated atmosphere for 8–24 h (depending on size and species) until they have relaxed (see below), rather than pin them immediately after death. It should be noted that some large insects, especially weevils, may take many hours to die in ethyl acetate vapors and a few insects do not freeze easily and thus may not be killed quickly in a normal household freezer.
It is important to eviscerate (remove the gut and other internal organs of ) large insects or gravid females (especially cockroaches, grasshoppers, katydids, mantids, stick-insects, and very large moths), otherwise the abdomens may rot and the surface of the specimens go greasy. Evisceration, also called gutting, is best carried out by making a slit along the side of the abdomen (in the membrane between the terga and sterna) using fine, sharp scissors and removing the body contents with a pair of fine forceps. A mixture of 3 parts talcum powder and 1 part boracic acid can be dusted into the body cavity, which in larger insects may be stuffed carefully with cotton wool.
The best preparations are made by mounting insects while they are fresh, and insects that have dried out must be relaxed before they can be mounted. Relaxing involves placing the dry specimens in a water-saturated atmosphere, preferably with a mold deterrent, for one to several days depending on the size of the insects. A suitable relaxing box can be made by placing a wet sponge or damp sand in the bottom of a plastic container or a wide jar and closing the lid firmly. Most smaller insects will be relaxed within 24 h, but larger specimens will take longer, during which time they should be checked regularly to ensure they do not become too wet.
Pinning, staging, pointing, carding, spreading, and setting
Specimens should be mounted only when they are fully relaxed, i.e. when their legs and wings are freely movable, rather than stiff or dry and brittle. All dry- mounting methods use entomological macropins — these are stainless steel pins, mostly 32–40 mm long, and come in a range of thicknesses and with either a solid or a nylon head. Never use dressmakers’ pins for mounting insects; they are too short and too thick. There are three widely used methods for mounting insects and the choice of the appropriate method depends on the kind of insect and its size, as well as the purpose of mounting. For scientific and professional collections, insects are either pinned directly with a macropin, micropinned, or pointed, as follows.
Direct pinning
This involves inserting a macropin, of appropriate thickness for the insect’s size, directly through the insect’s body; the correct position for the pin varies among insect orders (Fig. 17.2; section 17.2.4) and it is important to place the pin in the suggested place to avoid damaging structures that may be useful in identification. Specimens should be positioned about three-quarters of the way up the pin with at least 7 mm protruding above the insect to allow the mount to be gripped below the pin head using entomological forceps (which have a broad, truncate end) (Fig. 17.3). Specimens then are held in the desired positions on a piece of polyethylene foam or a cork board until they dry, which may take up to three weeks for large specimens. A desiccator or other artificial drying methods are re- commended in humid climates, but oven temperature should not rise above 35°C.
Micropinning (staging or double mounting)
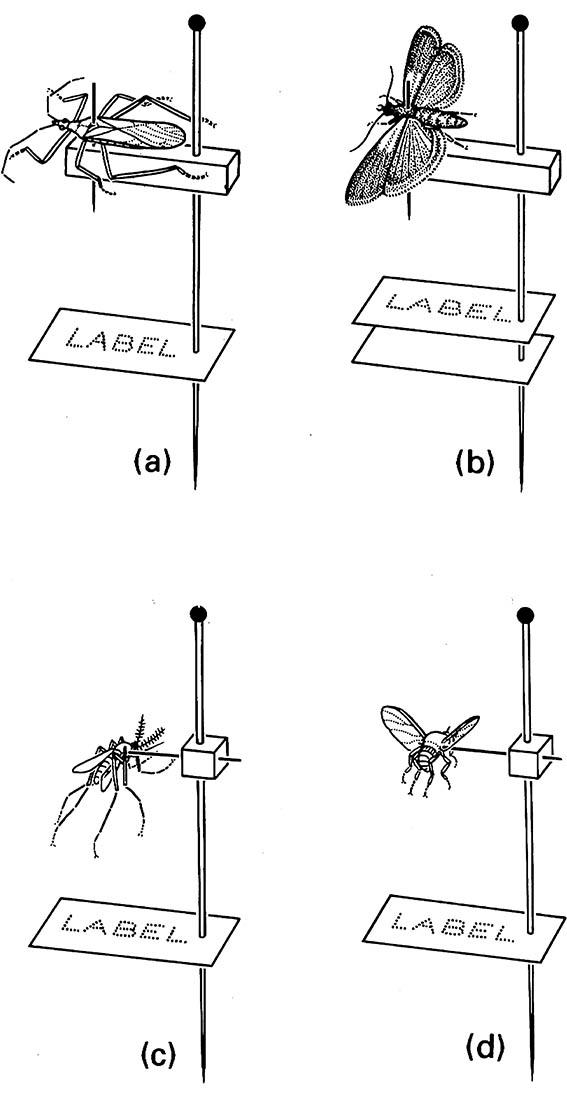
This is used for many small insects and involves pinning the insect with a micropin to a stage that is mounted on a macropin (Fig. 17.4a,b); micropins are very fine, headless, stainless steel pins, from 10 to 15 mm long, and stages are small square or rectangular strips of white polyporus pith or synthetic equivalent. The micropins are inserted through the insect’s body in the same positions as used in macropinning. Small wasps and moths are mounted with their bodies parallel to the stage with the head facing away from the macropin, whereas small beetles, bugs, and flies are pinned with their bodies at right angles to the stage and to the left of the macropin. Some very small and delicate insects that are difficult to pin, such as mosquitoes and other small flies, are pinned to cube mounts; a cube of pith is mounted on a macropin and a micropin is inserted horizontally through the pith so that most of its length protrudes, and the insect then is impaled ventrally or laterally (Fig. 17.4c,d).
Pointing
This is used for small insects that would be damaged by pinning (Fig. 17.5a) (but not for small moths because the glue does not adhere well to scales, nor flies because important structures are obscured), for very sclerotized, small to medium-sized insects (especially weevils and ants) (Fig. 17.5b,c) whose cuticle is too hard to pierce with a micropin, or for mounting small specimens that are already dried. Points are made from small triangular pieces of white cardboard which either can be cut out with scissors or punched out using a special point punch. Each point is mounted on a stout macropin that is inserted centrally near the base of the triangle and the insect is then glued to the tip of the point using a minute quantity of water-soluble glue, for example based on gum arabic. The head of the insect should be to the right when the apex of the point is directed away from the person mounting. For most very small insects, the tip of the point should contact the insect on the vertical side of the thorax below the wings. Ants are glued to the upper apex of the point, and two or three points, each with an ant from the same nest, can be placed on one macropin. For small insects with a sloping lateral thorax, such as beetles and bugs, the tip of the point can be bent downwards slightly before applying the glue to the upper apex of the point.
Carding
For hobby collections or display purposes, insects (especially beetles) are sometimes carded, which involves gluing each specimen, usually by its venter, to a rectangular piece of card through which a macropin passes (Fig. 17.5d). Carding is not recommended for adult insects because structures on the underside are obscured by being glued to the card; however, carding may be suitable for mounting exuviae, pupal cases, puparia, or scale covers.
Spreading and setting
It is important to display the wings, legs, and antennae of many insects during mounting because features used for identification are often on the appendages. Specimens with open wings and neatly arranged legs and antennae also are more attractive in a collection. Spreading involves holding the appendages away from the body while the specimens are drying. Legs and antennae can be held in semi-natural positions with pins (Fig. 17.6a) and the wings can be opened and held out horizontally on a setting board using pieces of tracing paper, cellophane, greaseproof paper, etc. (Fig. 17.6b). Setting boards can be constructed from pieces of polyethylene foam or soft cork glued to sheets of plywood or masonite; several boards with a range of groove and board widths are needed to hold insects of different body sizes and wingspans. Insects must be left to dry thoroughly before removing the pins and/or setting paper, but it is essential to keep the collection data associated correctly with each specimen during drying. A permanent data label must be placed on each macropin below the mounted insect (or its point or stage) after the specimen is removed from the drying or setting board. Sometimes two labels are used — an upper one for the collection data and a second, lower label for the taxonomic identification. See section 17.2.5 for information on the data that should be recorded.
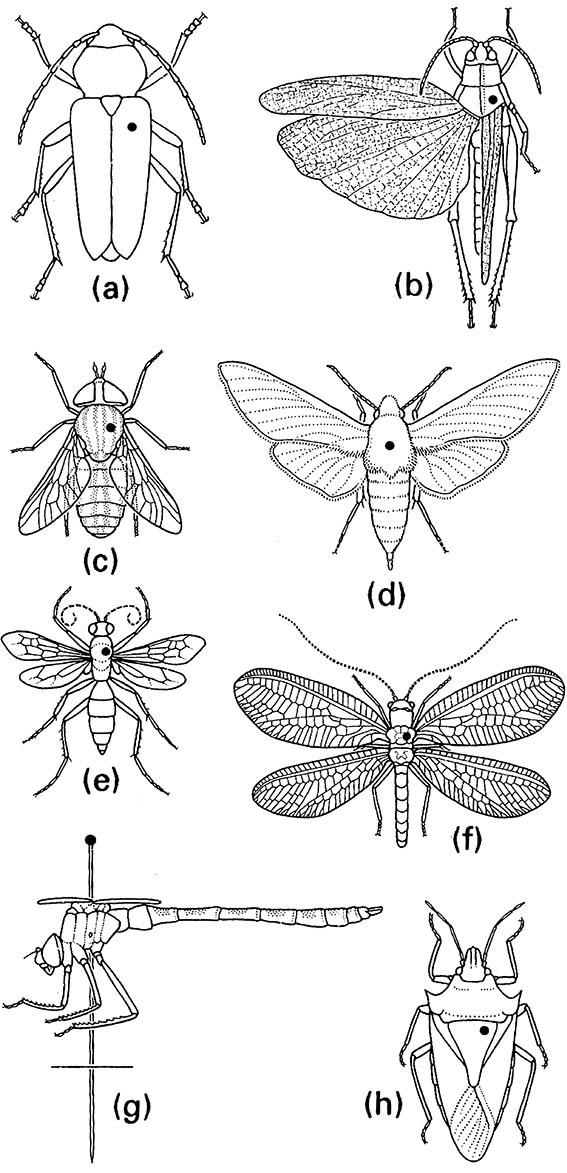
(a) larger beetles (Coleoptera); (b) grasshoppers, katydids, and crickets (Orthoptera); (c) larger flies (Diptera); (d) moths and butterflies (Lepidoptera); (e) wasps and sawflies (Hymenoptera); (f ) lacewings (Neuroptera); (g) dragonflies and damselflies (Odonata), lateral view; (h) bugs, cicadas, and leaf- and planthoppers (Hemiptera: Heteroptera, Cicadomorpha, and Fulgoromorpha).
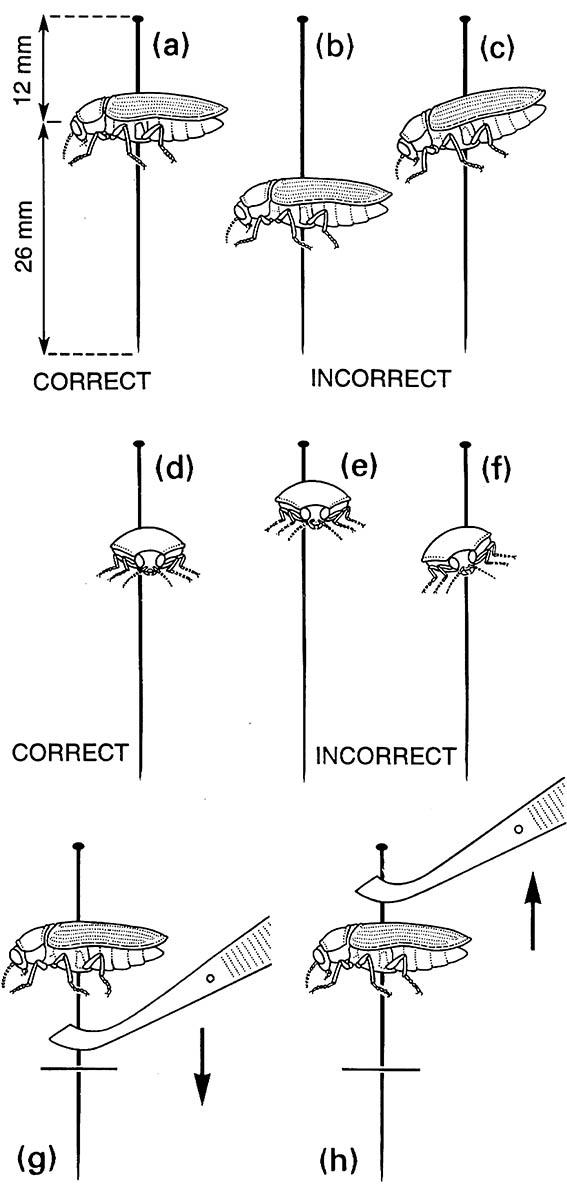
(a) insect in lateral view, correctly positioned; (b) too low on pin; (c) tilted on long axis, instead of horizontal; (d) insect in front view, correctly positioned; (e) too high on pin; (f) body tilted laterally and pin position incorrect. Handling insect specimens with entomological forceps: (g) placing specimen mount into foam or cork; (h) removing mount from foam or cork. ((g, h) After Upton 1991)
(a) a small bug (Hemiptera) on a stage mount, with position of pin in thorax as shown in Fig. 17.2h; (b) moth (Lepidoptera) on a stage mount, with position of pin in thorax; (c) mosquito (Diptera: Culicidae) on a cube mount, with thorax impaled laterally; (d) black fly (Diptera: Simuliidae) on a cube mount, with thorax impaled laterally. (After Upton 1991)
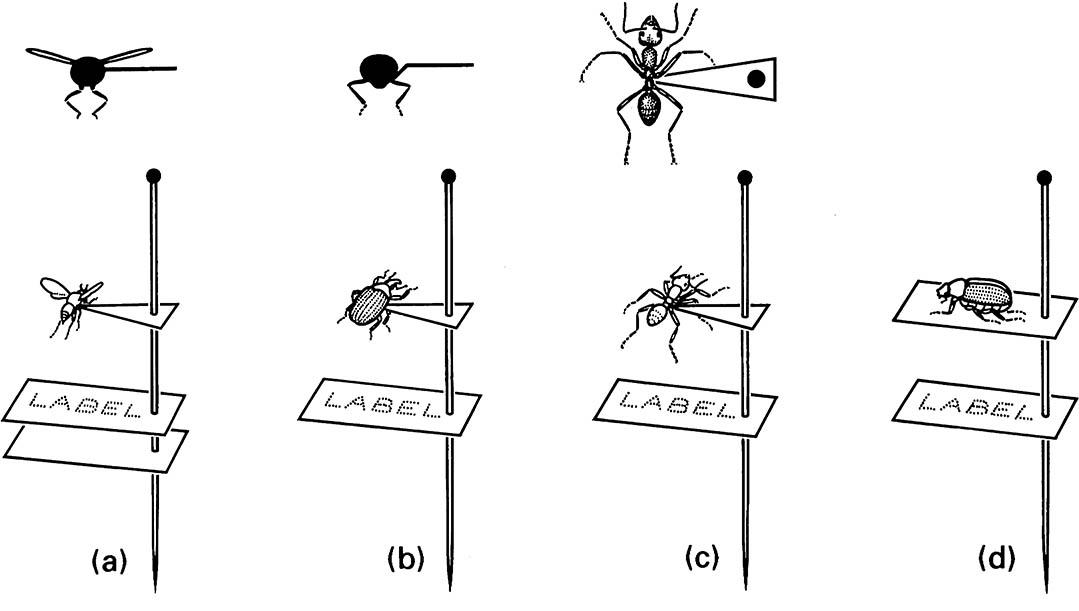
(a) a small wasp; (b) a weevil; (c) an ant. Carding: (d) a beetle glued to a card mount. (After Upton 1991)
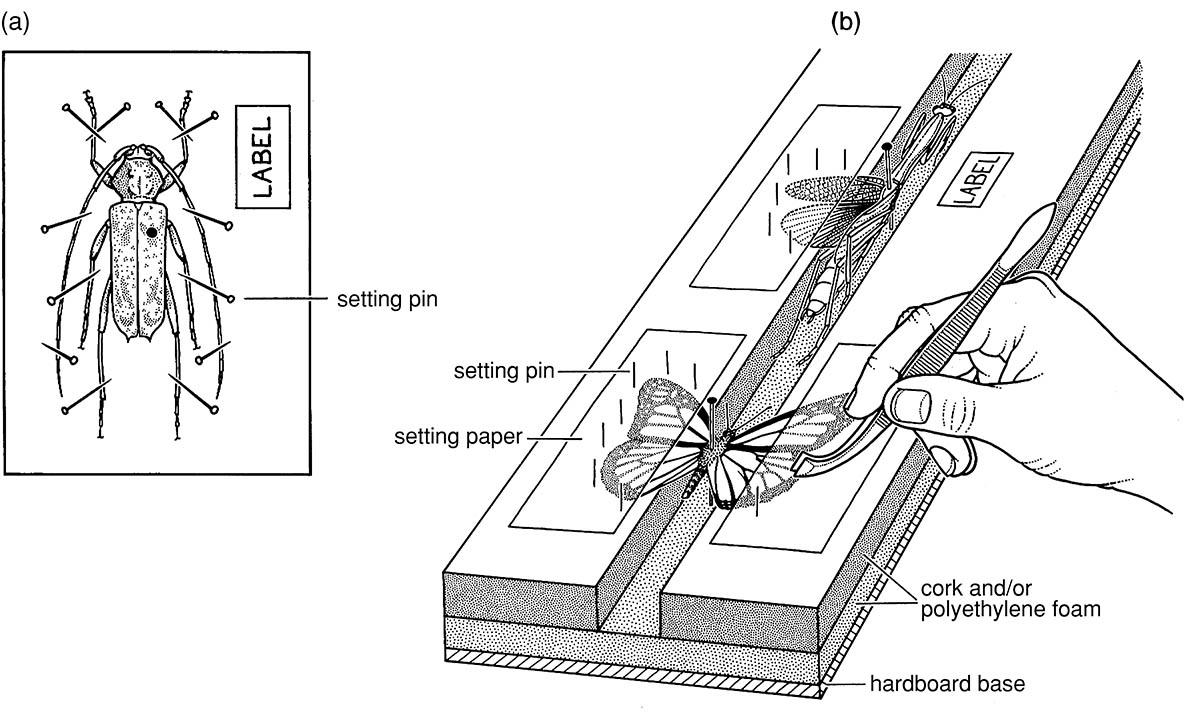
(a) a beetle pinned to a foam sheet showing the spread antennae and legs held with pins; (b) setting board with mantid and butterfly showing spread wings held in place by pinned setting paper. ((b) After Upton 1991)

